GarageBand also has some other cool mastering utilities such as multi-band compressors. Takes a while to learn to use them but hey GarageBand is a default iLife app with Mac computers.
Results 21 to 30 of 71
-
08-26-2011, 02:19 PM #21Tech Guru

- Join Date
- Jul 2011
- Posts
- 1,200

-
09-14-2011, 06:33 AM #22

So I just tried out with Live instead. For some reason it speeded up the mix
 ? Now I'm trying to so the bpm to 110 instead of 120. Am I doing something wrong?
-
10-27-2011, 08:48 AM #23Tech Mentor

- Join Date
- Feb 2011
- Posts
- 184

mmm newbie question here but how can one split tracks in ableton live?

-
10-31-2011, 04:49 PM #24

Is there any specific amount of time you should be playing each song when you're recording a mix? I've always been confused as to whether or not i've been playing the track too little or too long. I've seen people saying 51 tracks in 90 minutes? WHA-? I don't get it.. If I want to make like a 1 hour mix, do I play the whole song? or just the buildup and the drop?
-
11-06-2011, 03:21 AM #25

Each to his own mate, personally with the stuff i play (progressive trance, psytrance etc) i will try and fit 15-16 tunes in an 80 min mix, which gives each tune a good 4 1/2 minutes of clear unmixed space. Obviously with styles such as D & B, Dubstep and such you may go through a lot more tunes in the same time. Just experiment and see what sounds good to you. There are no definitive rules for this stuff
 Acer E5 i7 16GB 512SSD 2TBHD ~ WIN 10 ~ TSP 2.11 ~ AUDIO 6 ~ DUAL X1s ~ DN-X1600 ~ SPECTRA ~ TWISTER ~ ATH-PRO500 MK2 ~ ZED6FX ~ AT2020
" Im the Dude, so thats what you call me. That or, uh His Dudeness, or uh Duder, or El Duderino, if youre not into the whole brevity thing. "
-
11-10-2011, 02:51 AM #26

nice little tutorial i found for audacity users.
Last edited by Jester; 10-12-2012 at 12:25 AM.
Acer E5 i7 16GB 512SSD 2TBHD ~ WIN 10 ~ TSP 2.11 ~ AUDIO 6 ~ DUAL X1s ~ DN-X1600 ~ SPECTRA ~ TWISTER ~ ATH-PRO500 MK2 ~ ZED6FX ~ AT2020
" Im the Dude, so thats what you call me. That or, uh His Dudeness, or uh Duder, or El Duderino, if youre not into the whole brevity thing. "
-
11-28-2011, 11:16 PM #27Tech Wizard

- Join Date
- Nov 2011
- Posts
- 33

anybody use iZotope Ozone for mixtape mastering? will be very great see some guides about using Ozone for mastering mixtapes.
-
12-16-2011, 12:42 PM #28

Good lord, I feel like I'm stealing gettin all this info for free! Thanks a ton! c:
Macbook Pro 17" (Early 2011)
Moog Slim Phatty
Technics 1210 M5G
Technics 1200 MKII (Custom white w/ pink splatter for Breast Cancer Awareness)
Akai MPC 1000BK
-
01-05-2012, 04:56 PM #29Tech Student

- Join Date
- Jan 2012
- Posts
- 1

i was wondering is how to dj right: the art and science of playing records a good book to learn from
-
02-09-2012, 04:13 AM #30
 Mastering A Dj Mix Using Ableton Live, By DJ Smiley Mike ( www.trancendance.net )
So Ive been meaning to write a tutorial like this for awhile. If I was really slick, I could have made a video, but this is what you get at 11:30pm on a Wednesday night when I really should be going to bed. Ive been recording DJ mixes since the days of cassette tape, when there really want much you could do if you had messed up the levels and pushed into distortion. Of course, tape sounded pretty bad anyway, so it didnt matter much. Now, with the digital recording tools we have available, you can really make your mix sound pretty hot without needing a pile of money, an audio engineering degree or hours and hours of time. I usually record at least one mix per week, so my process is designed to be quick, with a minimal amount of fiddling.
This isnt intro course on Ableton. I assume that you know how to import an audio track and how to apply some processing to it. If you need some intro to Ableton, theres a ton of material out there including lots of YouTube videos.
This is not the only way to master an audio track. Ive used tools like Audacity before, but an advantage to this process is that I can save a collection of filters and audio processing as a preset, and I can preview how the final audio will sound without having to render the audio track. Once I have everything sounding the way I want, I just render (or export) the audio once.
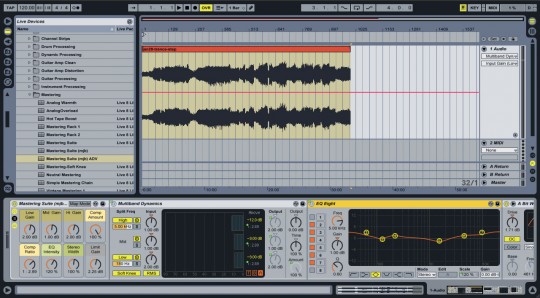
So heres my initial Ableton screen. I have already recorded my mix and Ive kept the levels down so that theres a little head room to play with. That is, nothing is maxed out. I usually record using Serato while Im mixing, but this will work for any recording.
You can see theres lots of fluctuation in the levels. Its pretty normal for me because I play trance and there are soft spots and heavy spots. The trick is to have them all balance out so that the perceived loudness is consistent even if the levels are lower in some spots. You can see Im using one of the Ableton Mastering racks. I used a built in one as a starting point and then added and tweaked things until I got something that was working for me pretty consistently.

So this is the rack that I use. The image is pretty wide so its probably hard to see. If you click on it, you should be able to see a larger version.
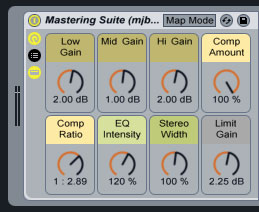
The first part of the rack is just a midi controller block. It allows me to take some of the controls that Im most likely to tweak and put them together at the front of the rack. I can also easily assign these parameters to the knobs on my midi-controller, but you dont need a midi-controller for this, and usually the adjustments I make are so minimal that I dont bother to use the midi-controller. (If you want one to experiment with, I use an Akai LPD8 which is pretty cheap, under $100. I mainly use it to control the DJ-FX effects rack and the SP-6 sampler rack in Serato.)
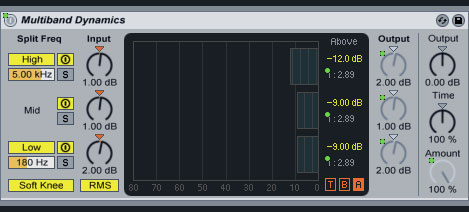
The first processor I run through is multiband dynamics. Im not going to pretend to be an expert on what this thing does or how it does it, but this is my layman interpretation: its a combination 3-band parametric EQ (low/mid/high) and compressor. So if any of the low, mid or high bands start to push too high, that band will get compressed, leaving the other bands untouched. The only parameters that I change on this box are the low/mid/high levels on either input or output. If one of the bands looks weak, boost it in the input side. If the sound you hear is lacking (or too harsh) in low/mid or high, adjust the output level for that band.
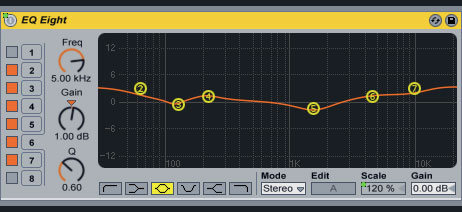
The EQ eight is an 8 band graphic equalizer. It has a lot of different modes that allow you to shape the sound differently. This curve was pretty default and I havent messed with it much. Once you have it set the way you like it, you can probably leave it alone. One of my midi knobs controls the EQ intensity (scale), but I almost always leave it where it is at 120%.
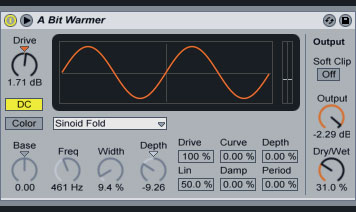
This box is basically a saturator that can warm or brighten the sound, especially in the midrange. This is one you have to be careful with though as too much can create a distorted mid sound. If your mids are weak (like older tunes off vinyl), this can help add new life and brighten them up to match todays recording quality of new releases. But if your mids are already bright, this should be turned down or even off. You can always do on/off tests while youre listening and see what sounds better. Make sure you test several spots in your mix. Theres a few ways to turn this down: you can reduce the Drive parameter, although (if I recall correctly) I usually have it somewhere between 2dB and -2dB, so no big moves. You can reduce the output (however I dont think I usually touch that much). Or you can adjust the Dry/Wet parameter. Dry/Wet exists on lots different boxes (audio processors/effects) and is just like a dimmer light switch. At 0% (Dry) the box is having no effect, at 100% (Wet) the box is full on, and anywhere in the middle the processor is having some effect.
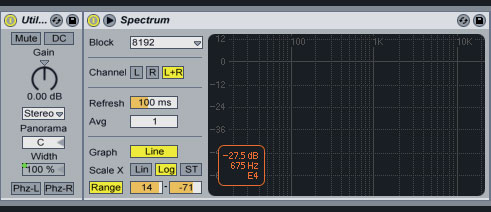
The skinny Utility module in the left was a default part of the mastering rack and I just left it in. It can enhance the stereo separation, but I dont ever touch it. The spectrum analyzer doesnt affect the audio signal, it just displays it. Its fun to watch, and you could potentially notice if your mids/lows or highs where missing, but you should have already fixed that with the multiband dynamics processor.
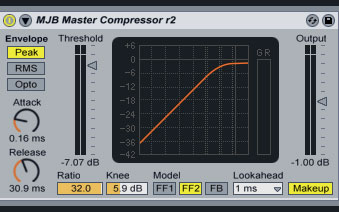
So weve sort of already run through a compressor back in the multiband dynamics section, but Im running through another one. I use this to bring up the lower levels while keeping the high levels from pushing off the top. What do I mean? Well, its like Im lifting the volume by a few dBs, so that the sound is nice an loud like a professional recording. But when I get close to the loudest parts, it rounds off and flattens out. If those loud parts got a boost in volume, they would be off the chart and into distortion. When you play some audio, youll notice a little yellow circle running up and down the red line to show you where the current level is at. I try to keep the yellow dot right around the bend (knee) of the curve most of the time. The output level I keep pretty consitent at -1dB. If my yellow dot (volume) needs to go up or down, I adjust the Threshold slider. (If I recall correct, down is louder, so its a bit counter-intuitive at first.) All the other parameters I keep where they are.
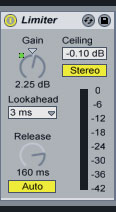
Im sure there are a bunch of technical differences between a compressor and a limiter, but they both help keep the levels from pushing too high. The compressor can still let a few spikes out, whereas the limiter pretty much cruches anything above 0dB down. The only setting I adjust is the Gain. I tend to aim for occasional limiting in the 0 to -3dB range. Maybe a bit less. If theres too much limiting happening (youll see the green bar pushing down from 0), then back off the Gain.
Once you have some settings you like, you can export your audio which will render all the processed audio into a new file. If you have a good base setting for all your parameters, you can save a preset in Ableton so you always have a starting point that is close to where you want to be.
Now Im pretty familiar with the process that I use now, so theres a good chance that Ive left out some details that might be less familiar to you. Please leave a comment and I will do my best to respond in a timely manner. That way other people that have the same question will be able to see the responses.
- Trancendance is a weekly live radio broadcast that airs every Sunday on CiTR 101.9fm from 10pm-Midnight (PST). Hosted by DJ Smiley Mike and his brother DJ Caddyshack, the show cycles through various sub-genres of trance, but there is often a slant towards Hard Trance, Epic or Uplifting Trance and, most recently, Psychedelic Trance.
Link: www.trancendance.netLast edited by Jester; 02-09-2012 at 10:29 PM.
Acer E5 i7 16GB 512SSD 2TBHD ~ WIN 10 ~ TSP 2.11 ~ AUDIO 6 ~ DUAL X1s ~ DN-X1600 ~ SPECTRA ~ TWISTER ~ ATH-PRO500 MK2 ~ ZED6FX ~ AT2020
" Im the Dude, so thats what you call me. That or, uh His Dudeness, or uh Duder, or El Duderino, if youre not into the whole brevity thing. "
Tags for this Thread
|
|


 Reply With Quote

Bookmarks