
https://www.sugarsync.com/share/dx0n9p3t42r3h
Ok following Mark Egloff's lead in the APC40 step Sequencer device, i'll be building the manual for this device so that it's contained within the device itself....
I've detailed how to set up your ableton preferences and configuring the device for the first time....
The next tab details how to set up a template using the device in a return track...
I'll finish the final tab explaining how the Shuffler Scene works but in short...
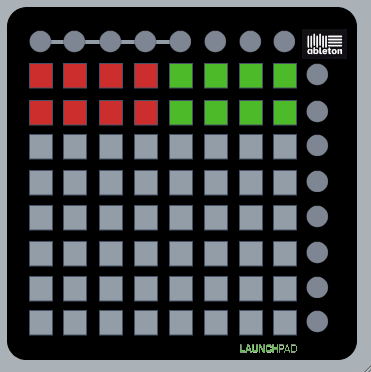
1, Press and hold User 2 and the Vol Button (Round Button at the right hand side)
2, Bank Select Up resets the grid
3, Bank Select Down toggles each slice between Mute and Play
4, Bank Select Left toggles each slice between Reverse and Play
5, Bank Select Right toggles each slice between Play and Reverse
The running metronome changes colour to indicate which mode you're in, each first press of an unlit button will configure that slice to the default action for the colour displayed:
Green = Play
Orange = Reverse
Red = Mute
The shared folder also includes Isotonik 7 Lite and a host of effects racks i've used in previous templates....
Get on board and let me know what you think....
Cheers
D

Results 1 to 10 of 18
-
05-11-2011, 04:41 PM #1Tech Mentor

- Join Date
- Nov 2008
- Posts
- 351
 Octop4d 2 Lite (Free) M4L + Novation Launchpad
-
05-13-2011, 02:45 AM #2Tech Mentor
- Join Date
- Nov 2008
- Posts
- 351
Oh i forgot to say, the device includes the complete monitoring and lighting patches for the full version, it's also laid out with comments so anyone wanting to get their hands dirty and build there own version has got a head start, took me about a week to build it so enjoy!
Cheers
D
-
05-18-2011, 03:36 PM #3Tech Mentor
- Join Date
- Nov 2008
- Posts
- 351
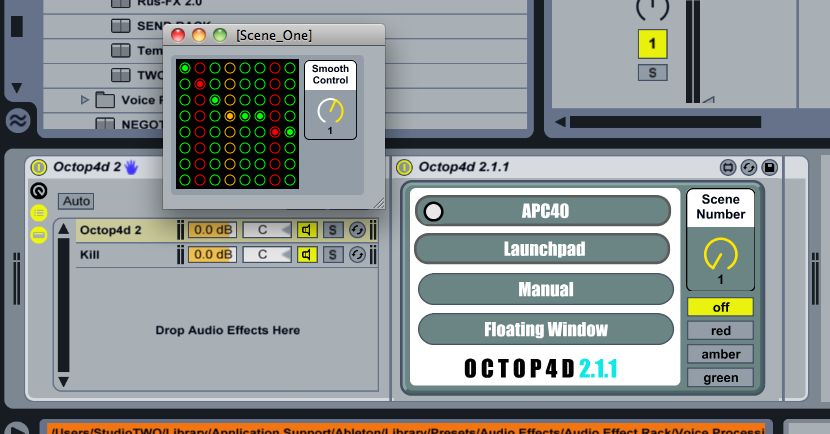
Just testing an update to Octop4d Lite (it'll be an adg rack so you can just drop it on a return track and it'll find it's own paths)
Previous the top right button reset all steps, however now i've made the button a toggle, the device resets to standard steps when dropping it into a set.... But when you toggle between on and off the following happens....
ON = the current step pattern is routed to the master out with a utility kill cancelling out the original audio so only the effect is left...
OFF = the utility kill is turned off, the return track is set to zero volume and the cue for the return track is turned on, this allows you to audition the effect in your headphones before making it live, as audio is always being buffered this avoids any traces of previous loops happening if you want to switch in and out of the effect....
I've also fixed the error whereby changing scenes (albeit there's only one in the lite version) would lose the correct lighting of which tracks are sent to the device (the side round buttons).... I've also changed the code relating to using the APC40 as the primary device that the clip launch rectangle relates to....
Remember this versions free, now that Scene One is fully completed i'll start to work on the second scene.....
Cheers
D
-
05-21-2011, 10:02 AM #4Tech Mentor
- Join Date
- Nov 2008
- Posts
- 351
Hi All,
I've just uploaded to the Octop4d shared folder version 2.1.1 which is available to all subscribers of the full device...
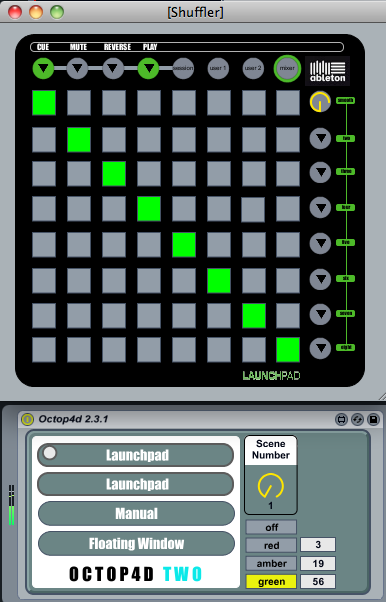
It adds the functionality to the Lite version the ability to record the patterns you create with the Launchpad within your live set so that they play back when recorded, it coincides with a floating window that represents the Shuffler scene. This can be opened by clicking on the GUI or pressing and holding the User 2 button for more than a beat (it acts as a toggle and will close if you move away from Scene One, in fact it will shuffle between the various scenes whilst you have it open eventually)
Having the floating window has also meant i've exposed the buttons to be able to be midi mapped to any other grid controller, i've some work to do to add the other buttons such as the send control and the direction control buttons but these will be added as i want to not limit the device wholly to a Launchpad....
Theres a handy upgrade button in the Lite version that'll take you to my website where you can join in the development of the device...
Cheers
D
-
05-24-2011, 03:59 AM #5Tech Mentor
- Join Date
- Nov 2008
- Posts
- 351
So i found a little frustration with the way the control surfaces work last night, took forever to realise it.... Octop4d Lite and Octop4d 2 are programmed so that they currently work when the Launchpad is selected as the second control surface slot.... Sadly if you have nothing in the first control surface slot it seems to see the second one as the first one... Of course that means it doesn't even recognise the Launchpad is connected....
So last night my time was spent recoding each of the live observers so that you can have the launchpad in any of the control surface slots.... I managed to get a little time in to wire up the lighting and control for the second scene so i can now start working on the actions...
I'll try and do the same for the Lite version when i get time but if you have any problems getting the launchpad to be recognised then try setting up a control surface such as the APC40 in slot one with the Launchpad as slot 2....
Cheers
D
-
06-12-2011, 05:07 PM #6Tech Mentor
- Join Date
- Nov 2008
- Posts
- 351
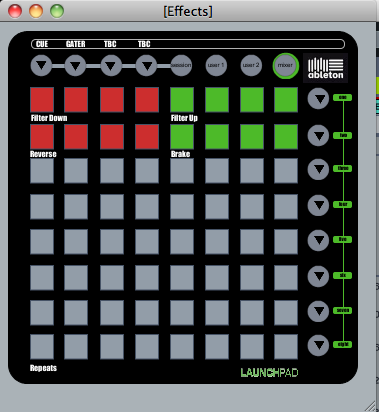
Scene Two finished and uploaded....
Again as with scene one the Learn button allows you to audition the effects before going live however this scene is more about playing it live than preparing anything, Side round buttons again react to the send levels in Live and switch the 8 tracks within the clip launch rectangle chosen to send audio to the device or directly to the master...
Top Row of buttons perform filters down (Red) and up (Green) at different rates from 1 beat (centre buttons) to 16 beats (outer buttons)
Second Row is different speeds of reverse (Red) and Turntable Brake (Green)
The bottom six rows (in grey above but they light in columns when pressed) are a 8 step beat repeat style affect allowing you to trigger a repeat of the last bar played at any point divisible by 8ths, the lowest size slice is 1/64th playable by pressing any of the buttons on the bottom row rising to the top row which triggers a half bar sized slice...
As with the first scene the top row of round buttons become a visual metronome that give you the indication of where to catch the audio you want repeated...
I'll do a video when i get time, more coding to do!!
Cheers
-
06-19-2011, 08:17 AM #7Tech Mentor
- Join Date
- Nov 2008
- Posts
- 351
It's been a busy day, i've tidied up the GUI for each of the floating scene windows that act as heads up displays but also mini manuals on what controls what...
Ive also added in three number boxes on the main GUI, changing the values in these boxes changes the led feedback colours, this is specifically for anyone who is colour blind to enable them to use more preferable hues as there are 3 colours with numerous levels of brightness that can be chosen from...
Scene One Shuffler...
Scene Two Effects...
Now with the return of the synced Gater button
And Scene Five Looping...
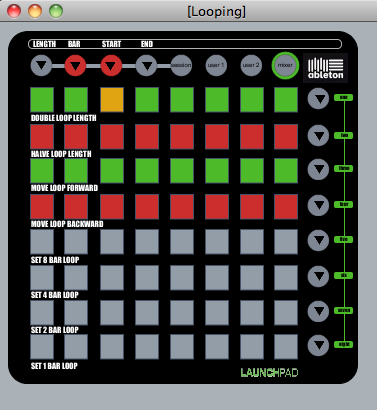
Now for a break i think....
Cheers
DLast edited by S4racen; 06-19-2011 at 03:38 PM.
-
06-24-2011, 06:23 AM #8Tech Mentor
- Join Date
- Nov 2008
- Posts
- 351
Updating the Lite version of Octop4d at the weekend to include the developments to Scene 1, Shuffler, so that you can use the device with the Launchpad in any control surface slot...
In addition for the colour blind users you can also define the three LED states for the Launchpad (mine is a second so my oranges are nearly red)
And finally the Floating window GUI has been updated to those above to better represent the Launchpad, you open it by pressing and holding the User 2 button and do the same again to close so negating the need to use the mouse...
Cheers
D
-
07-02-2011, 01:20 PM #9Tech Mentor
- Join Date
- Nov 2008
- Posts
- 351
2 days of rewiring has taken me from this....
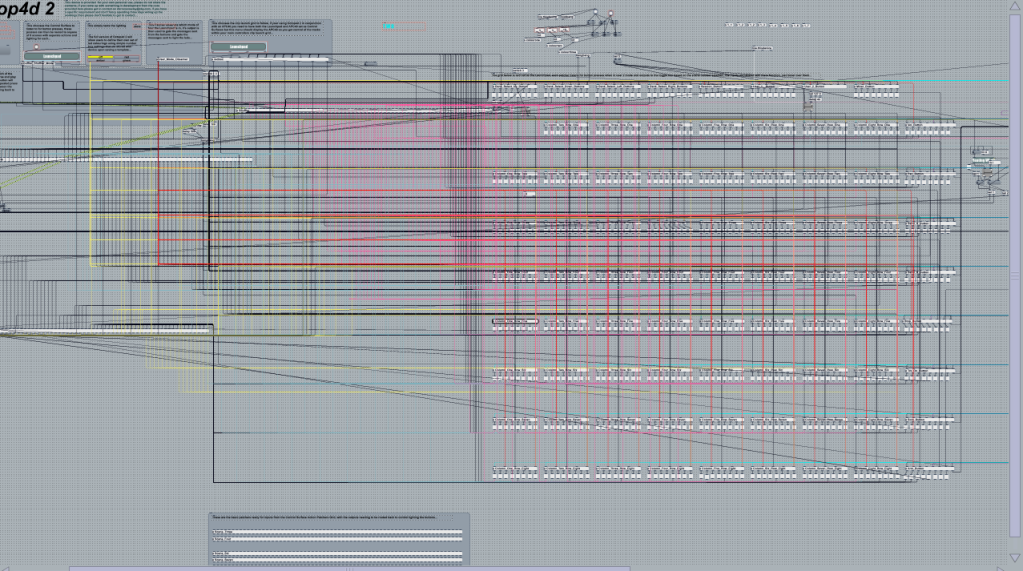
to this...
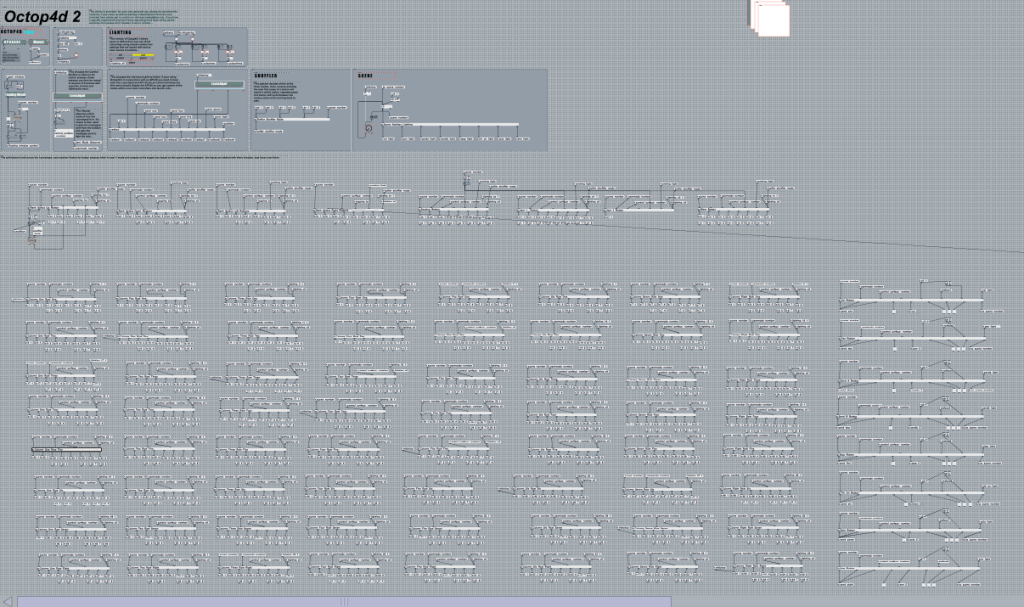
And why.... Well i couldn't make a start on the fourth scene because of all the patch cords all over the place, so i returned to using send and receive objects. I ditched these about a year ago due to cpu issues but i'm pleased to see an actual reduction in cpu at standstill and a massive improvement in speed when switching between the scenes.... Sadly this means that the stuff i've learnt building this second version of Octop4d will have to be transferred back into Isotonik with a new revision.... Got next week off....
Cheers
D
-
07-05-2011, 05:35 AM #10Tech Mentor
- Join Date
- Nov 2008
- Posts
- 351
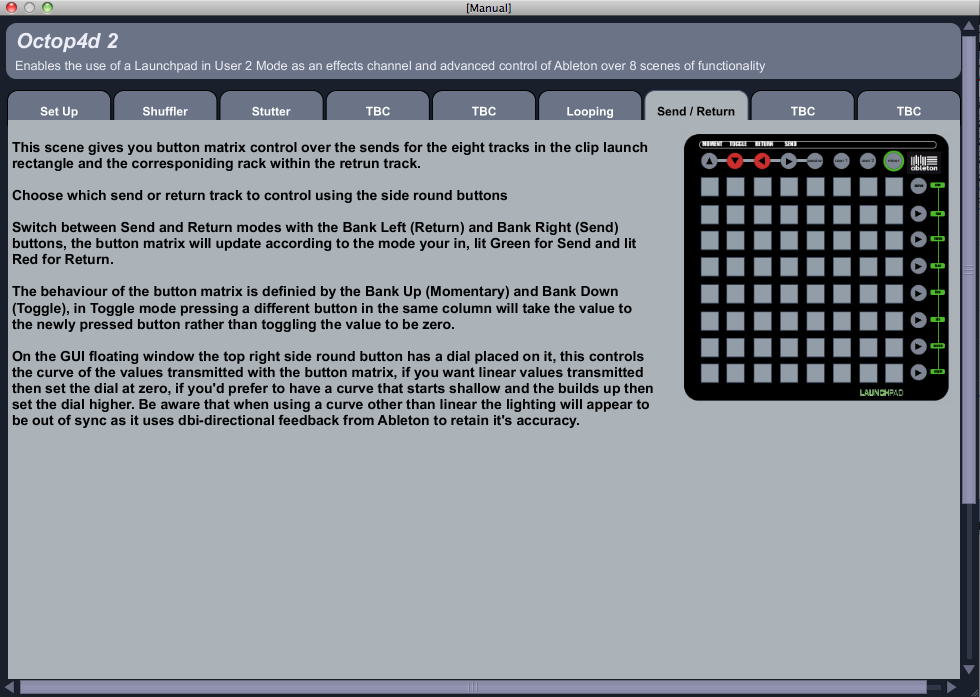
I'll let the manual do the talking...
Uploading now....
Cheers
D

 Reply With Quote
 Posting Permissions
|
|
© 2023 DJTechTools
Bookmarks