Shorten your RCA cables to avoid clutter

Shorten your RCA cables to avoid clutter

Disclaimer: This tutorial assumes you know how to work a solder iron.
Note: “Tinning” is when you apply a small amount of solder to make it easier to join the wire to the metal.

The photo size is rather large so you have a very clear image to compare to.


The reason I am writing this tutorial is simple. I have an 8 foot length of RCA cable and only need 6 inches of it. The rest ends up tangled, and I’ve noticed some distortion. So I went out and picked up 8 RCA connectors, and went to work.


Step 1: Cut your cable to the length you need. Mine had a plastic square at each end to prevent splitting the wire all the way, so I used those as the centres.


Step 2: strip the outside off of the wire. This will expose a central wrapped wire, and a lot of thinner wires all the way around. Pull the outer wires to one side, and twist them up.


Step 3: Strip the inner wire, but leave it slightly longer than the coating on the outside of the whole chord. This central wire will be your signal wire, and the outside one you twisted is your ground.


Step 4: Do the same thing to the other 4 ends of the cable.


Step5: “Tin” the ground wire with a small amount of solder. Don’t use too much, or the wire won’t fit in the ground hole on the connector. “Tin” the signal wire as well.


Step 6: Rinse and repeat with the other 4 ends.


Step 7: take your connector and remove the outer shield. Connectors all look a little different here, but the next few steps are generally the same. You will have on the end that plugs in, a channel down the middle, and a metal ground with a hole in it, as well as 2 metal clamps which will hold the cable in place.


Step 8: “Tin” the centre channel. This is where your signal wire will go.


Step 9:
MOST IMPORTANT STEP
Slide the outer shield and spring, if you have one, over the chord you are attaching the connector to. DO NOT forget this step. I assure you, once you have soldered a beautiful connection and realise the shield is not on the chord, this project become less fun.


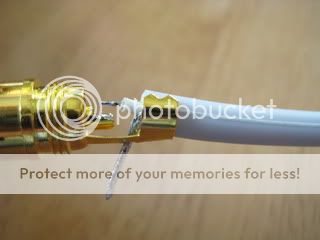
Step 10: spread open the metal clamps on the connector, and feed the ground wire through the hole. Pull it all the way down so that the signal wire is almost touching the centre channel.


Step 11: Solder the signal wire to the centre channel. Make sure you don’t keep the solder iron here too long, or you will melt the plastic inside the connector and will end up with a loose connection.


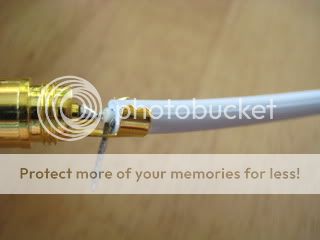
Step 12: Bend the ground wire back towards the cable, and solder it in place. The solder, combined with the bend in the ground wire and the metal clamps will keep your whole connector from ripping apart when you unplug it.


Step 13: Bend the metal clamps around the cable to secure everything together, and slide the shield up, and screw it all together.


Step 14: rewind, and do the other 4.


The new shorter cables sound just as good, if not better than the long ones. Everything is just al little neater now.

Great post!

Hey thanks a lot man. It wasn’t as much work as i thought it would be, A lot of fun!

Out of curiosity, has anyone else made RCA cables, or any other cables? Since doing this write up, I’ve been hooked. Its cheaper to buy, but much more fun to make. This weekend I’m making some more RCAs, a 3.5mm to RCA, and a couple of RCAs that have 2 males on one end, and one male on the other end for a switch box project I came up with. <–more on that one when I get all of my parts. Am I the only DIY cable maker here? Lol

I’ve got some 10ft RCA’s that I used to use when my laptop was not near my decks, and I used a motu ultralite with mixvibes. They were high quality cables, and I haven’t used 'em since I put my laptop on the desk with my decks.

Thanks for the write up - I’m gonna give this a bash…

Of course - you know where this leads, right??? Home made multicore cables… :sunglasses:

I’m sure I could quite easily get addicted to cable making.

Careful, cable making is like tattoos, gambling and smack, once you start, its all over hahah.
I’m making some single strand black cables with gold tips. Just discovered the joys of heatshrink.

Great work, and they look also good :slight_smile:

i want to do this for a long time, but i’m affraid of that “tatoo” princip :smiley:

great post man! Thanks for all the clear pics!

Mmmmm heatshrink

I’d like to do this, but I can’t for the life of me find any suitable cable around here :confused:

I posted a while back on the importance of self made RCA’s.

They will last forever!

I fucked up with mine. I did not calculate that i needed 4 points per cable.
So I bought too few RCA points.

I got more last week and made my last 3 cables.

I now have 8. I used the flexible Mic cable and its awesome!

Out of interest, what did you pay for your plug points?

I was offered the ones like you have for R15 each. Thats about $2.

I knew I could better ones for a few extra bucks, so I then found some Amphenol’s.

VERY VERY COOL plugs!

http://www.amphenolaudio.com/Amphenol_RCA.html

Got the red and back. Slick!

Good job mate! You have actually got me wanting to do my own now..

I make cables on a daily basis for my work (electronic engineer) So making cables is a easy task for me.. Might consider doing this in the next few weeks.

The connectors cost me $1.50 each. They aren’t the best, but they do work pretty well. I want to make some really nice cables, but playing with my gear seems to be more important lately. Lol

Yeah mate, anything is better than those plastic covered rubbish.

Those will do the trick nicely!

I recon the Amphenol’s are a step away from Neutrik, which is bordering on audiophile vibes!

:slight_smile:

someone should make this a sticky!!!

I have a few odd sizes I need to make myself.

OK So I got as far as clipping the ends off a cable and stripping the wire. Lo and behold, two, not one, sleeved wires inside, along with the stranded ground wire. This was a Phoenix cable with RCA plugs on one end and quarter-inch on the other end. I clipped off the quarter inch ends and there are the three wires inside. So is this the wrong kind of cable? Or which of the sleeved wires should I be looking at as the signal wire? (One is red, the other is yellow).

Its audio, so as long as left on one end is the same wire as left on the other end, you will be fine. Same goes for right. That means you can either take the ground, split it, and have left and right. Makes for a thinner wire, or you can ignore one of the 3 wires, and follow the steps above the same. Take a picture though, it will be easier to help you out.

Ah ok… and I suppose that means I have to clip the other end or I won’t know which is which?

I’ve been making cables for a while I tend to use more car audio stuff only because I have loads of left overs from my boy racer days works really well and a nice beefy look to it

Great post! Really thorough guide. I’ve made my own ethernet cables before, never audio cables, but I’m planning on doing so next weekend because I bought an s4, and the only thing i dislike are the TRS outputs, so I’m planning on making a TRS-XLR cable for connecting to my speakers. This site has nice diagrams for most audio connections: